


Mastering the Grade: A Collector's Guide to Preparing Trading Cards for Professional Grading
Preparing your trading cards for grading is an essential process for collectors looking to preserve the value and condition of their collectibles. Whether you're dealing with sports cards, trading card games like Magic: The Gathering or Pokémon, or any other collectible card, understanding how to inspect and prepare your cards for submission to major grading companies like PSA, Beckett Grading Services (BGS), or CGC is crucial. This comprehensive guide will walk you through the steps needed to inspect and prepare your cards, ensuring they are in the best possible condition for grading.
Understanding the Grading Criteria
Understanding the grading criteria is foundational in preparing your cards for evaluation by major grading companies. Each company has its own specific set of standards, but the core criteria remain consistent across the industry: centering, corners, edges, and surface. Let's delve deeper into each of these aspects to better understand what graders look for and how it impacts the overall grade of your card.
Centering: Centering refers to how well the image on the card is aligned within its borders. Perfect centering means that the borders around the image are equal on all sides. Grading companies often use a specific ratio to determine the centering grade, such as a 50/50 ratio for front and back, but slight deviations are acceptable for near-perfect grades. For example, a card might be considered well-centered if the front is 55/45 and the back is 60/40. Understanding the tolerance for centering discrepancies is crucial, as even minor misalignments can impact the card's final grade.
Corners: The condition of a card's corners is a critical aspect of its overall grade. Graders look for sharp, undamaged corners for the highest grades. Any signs of wear, fraying, or rounding can significantly lower the grade. Even when a card is stored properly, it can still suffer from corner wear over time due to handling or environmental factors. High magnification tools are used by graders to inspect corners for the slightest imperfections, which might not be visible to the naked eye.
Edges: The edges of a card are scrutinized for fraying, chipping, or whitening, which are indicators of wear and handling. The quality of the card's edges contributes significantly to its structural integrity and aesthetic appeal. Special attention is given to colored edges, as imperfections are more visible compared to white-bordered cards. Cards with darker borders require extra care during handling and storage to maintain edge condition.
Surface: The surface evaluation covers a wide range of potential flaws, including scratches, scuffs, indentations, printing anomalies, and gloss irregularities. Surface condition can be affected by handling, storage, and even the manufacturing process itself. Graders use direct and angled light to uncover any defects that may affect the card's visual appeal. A flawless surface is essential for achieving the highest grades, underscoring the importance of proper card protection from the moment of acquisition.
Each grading company has its own grading scale and standards, which can slightly vary. For instance, PSA (Professional Sports Authenticator), BGS (Beckett Grading Services), CGC (Certified Guaranty Company), and SGC (Sportscard Guaranty Corporation) each provide detailed guidelines on their websites regarding how they assess these four criteria. It's essential to review these guidelines thoroughly before submitting your cards for grading. This knowledge will enable you to conduct a pre-assessment of your cards, allowing you to set realistic expectations for their grading outcomes.
Practical Tips
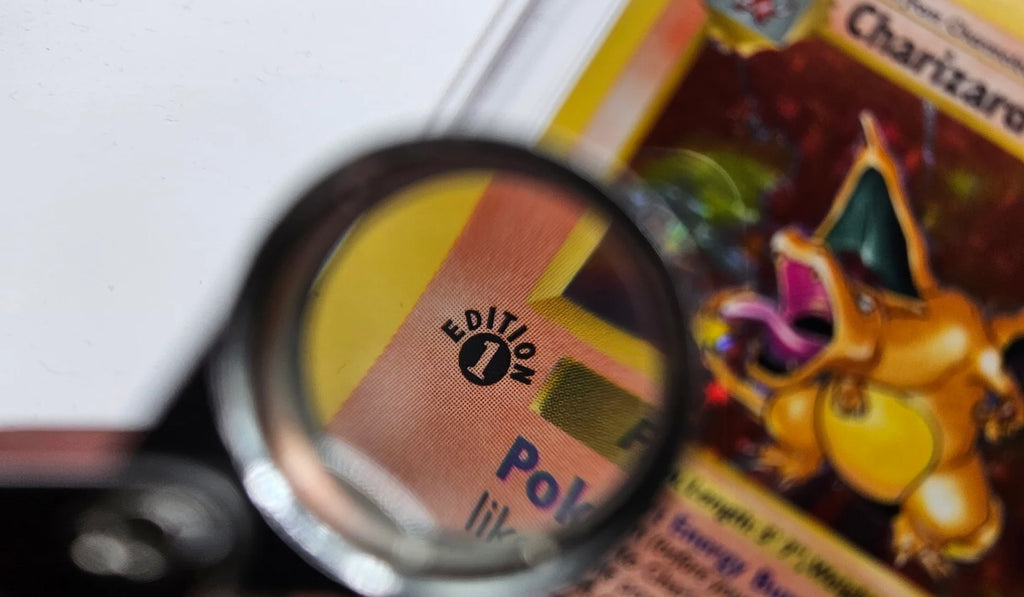
Leverage Grading Tools: Using a magnifying loupe equipped with illumination serves as an essential measure in obtaining a preliminary assessment of your trading card's potential grade. This tool is particularly beneficial as it brings to light subtle imperfections that could easily be overlooked when relying solely on the naked eye. Such minor defects, if not identified, could negatively impact the card's final evaluation. By incorporating the use of a loupe, collectors and enthusiasts can gain valuable early insights into how their card might perform during the detailed grading process, allowing for a more informed understanding of its condition and potential value.
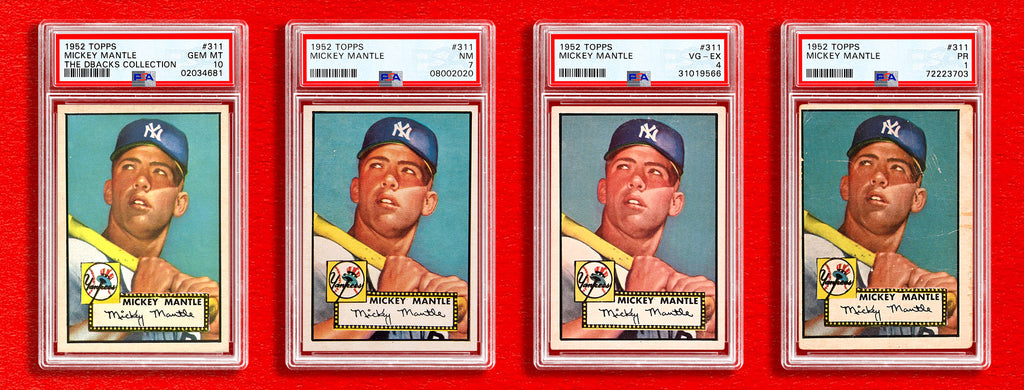
Examine Graded Examples Thoroughly: To get a clearer picture of the grading criteria, it's beneficial to study cards that have already undergone the grading process by the same company. This research can be particularly enlightening when focusing on cards that have achieved high grades. Analyzing these examples allows you to discern the standards of excellence according to the grading company and understand the nuances of what constitutes a perfect grade in their evaluation.
Adopt a Conservative Estimation Approach: When unsure about the potential grade of a raw card, it's prudent to err on the side of caution and assume a lower grade. Grading can be a costly endeavor, and if your primary aim is investment, it's generally wise to submit only those cards that you confidently believe will secure a high grade. This conservative estimation approach helps in minimizing the risk of incurring unnecessary expenses on grading fees for cards that may not yield a significant return on investment.
Initial Inspection
The initial inspection of your cards before submitting them for grading is a critical step that cannot be overstated. This process requires meticulous attention to detail, as the condition of your cards directly influences their final grades. Here's how to conduct a thorough initial inspection, with practical tips and techniques to ensure your cards are evaluated accurately.
Optimal Environment for Inspection
Good Lighting: Perform your inspection in a well-lit environment. Natural sunlight is best, but if that's not possible, use a bright, white LED light. The goal is to mimic daylight as closely as possible, as it provides the most accurate representation of the card's condition.
Magnification Tools: A magnifying glass or a jeweler's loupe is indispensable for spotting imperfections that are invisible to the naked eye. Opt for a magnification level that allows you to see fine details without straining your eyes. A 10x magnification is generally sufficient for most collectors.
Step-by-Step Inspection Process
Surface Check: Start with the surface of the card. Look for any scratches, scuffs, or indentations. Pay special attention to the card's finish; glossiness should be consistent, and any dull spots could indicate damage. Reflection under a light can help reveal imperfections you might not see otherwise.
Edges and Corners: Examine the edges for whitening, fraying, or chipping. Rotate the card slowly under the light to catch any irregularities. Corners deserve special attention as they are prone to wear. Look for rounding, softening, or any signs of fraying. A loupe can be particularly useful here to catch the finest details.
Centering: Assessing centering can be challenging but is vital for the card's grade. Compare the borders on each side of the card; they should be symmetrical. Some collectors use a ruler or a centering tool to measure the borders for precision. While perfect centering is rare, understanding how close your card is to ideal measurements can help set your expectations for its grading.
Creases and Wrinkles: Hold the card at an angle to the light to check for any creases, wrinkles, or bending marks. These flaws can significantly impact the card's integrity and are often more visible when light passes over them at an angle.
Additional Tips for a Successful Inspection
Handling Cards: Always handle your cards carefully. Hold them by the edges to avoid fingerprint smudges or additional surface damage. For high-value cards, consider wearing latex gloves.
Documentation: If you're inspecting multiple cards, it's helpful to document your findings. Make notes about each card's condition, potential issues, and overall grade expectation. This documentation can be useful for insurance purposes, future sales, or simply for your records.
Seek a Second Opinion: If you're unsure about a card's condition, consider seeking a second opinion from a fellow collector or a professional. Sometimes, a fresh set of eyes can catch something you missed.
Learn from Grading Companies: Many grading companies share detailed reports on graded cards, highlighting why a card received its grade. Studying these can improve your ability to spot issues during your inspections.
Regular Reviews: Even if you're not planning to submit your cards for grading immediately, regular inspection is a good practice. It helps identify any new issues that may arise from storage or environmental factors and keeps you familiar with your collection's condition.
Cleaning the Cards
Cleaning your cards before submission for grading is a delicate process that requires careful attention to detail and the right technique to ensure that you do not inadvertently damage them. Here's a detailed guide on how to properly clean your cards, preserving their integrity and appearance.
Choosing the Right Materials
Soft, Lint-Free Cloth: Use a microfiber cloth or another type of soft, lint-free cloth. These materials are gentle on the card's surface and won't leave behind any fibers or residue.
Distilled Water: If you need to dampen the cloth, always use distilled water. Tap water can contain minerals and other impurities that might leave deposits on your card.
Cotton Swabs: For very small or stubborn spots, a cotton swab lightly moistened with distilled water can be used with great precision.
Cleaning Process
Dry Wipe: Start by gently wiping the surface of the card with a dry microfiber cloth. This can remove a significant amount of dust and loose debris without the need for moisture. Hold the card by its edges to prevent additional fingerprints during the cleaning process.
Moist Wipe (if necessary): If dry wiping doesn't remove all the dirt or smudges:
- Lightly dampen a corner of the cloth with distilled water. The cloth should be just barely moist, not wet.
- Gently wipe the affected area of the card. Do not apply pressure as you might damage the surface or edges of the card.
- Immediately follow up with a dry part of the cloth to remove any moisture. This step is crucial to prevent water damage.
Dealing with Stubborn Spots: If a spot doesn't come off with a gentle wipe, consider leaving it as is. Aggressive cleaning can do more harm than good, potentially scratching the card or affecting its natural finish.
Precautions
No Harsh Chemicals: Never use cleaning agents or solvents on your cards. These can strip the finish, discolor the paper, and significantly reduce the card's grade and value.
Avoid Direct Pressure: When wiping, do not press hard. Use gentle motions and let the softness of the cloth do the work.
Fingerprints: Always handle cards by their edges, even when cleaning. Oils and sweat from your skin can leave marks that are difficult to remove and may affect the grading.
Testing: If you're unsure about the cleaning process, test your method on a less valuable card first. This can give you a sense of how much pressure to use and how the card reacts to moisture.
After Cleaning
After you've cleaned your card, allow it to sit for a short period to ensure it's completely dry, especially if you had to use a dampened cloth. Once dry, proceed to sleeve and top-load (or semi-rigid holder) your card as soon as possible to protect it from any dust, debris, or potential handling damage.
Handling Techniques

Appropriate handling and maintaining the right environmental conditions are vital for keeping your collectible cards in mint condition, particularly in the lead-up to their grading. These measures are key to avoiding immediate harm to your cards and play a significant role in their preservation over time. In the following sections, we delve into the basics of how to handle your cards correctly and the optimal conditions for examining and cleaning them to ensure their longevity and maintain their value.
Handling Cards
Holding Cards by the Edges: This is the golden rule for card handling. Contact with the surface can transfer oils, dirt, and acids from your skin to the card, potentially causing long-term damage. Grasping the card by its edges minimizes the risk of surface contamination or scratching.
Use Latex Gloves: For an additional layer of protection, wearing latex or Nitrile gloves can be beneficial, especially when handling high-value or particularly sensitive cards. These gloves prevent direct skin contact, safeguarding against fingerprints and smudges that can detract from the card's appearance and grade.
Gentle Touch: Apply minimal pressure when holding or moving cards. Excessive force can bend the card or damage its edges and corners, which are critical areas of focus during the grading process.
Consider Your Surroundings
Clean, Well-lit Workspace: Ensure the area where you handle your cards is clean and free of clutter. A well-lit environment is essential for accurately assessing the condition of your cards, enabling you to spot imperfections and handle the cards safely. Natural light is preferable, but if that's not available, a bright LED lamp that closely mimics daylight can be an effective alternative.
Food and Drink Free Zone: Keep food and drinks away from your workspace. Spills can cause irreversible damage to cards, and crumbs attract pests that could further harm your collection. Establishing a strict policy of no food or drinks near your cards is a simple yet effective way to avoid accidents.
Humidity Control: High humidity levels can warp cards and encourage the growth of mold and mildew, while too low humidity can make cards brittle. Strive to maintain a stable, moderate humidity level in your storage and handling areas. Using dehumidifiers or humidifiers, depending on your climate, can help achieve and maintain the optimal humidity level for card preservation.
Temperature Regulation: Like humidity, extreme temperatures can adversely affect your cards. High temperatures can lead to discoloration and warping, whereas cold temperatures can make cards brittle. Keeping your storage and handling areas at a consistent, moderate temperature helps prevent these issues.
Additional Tips for Safe Handling
Transferring Cards: When moving a card from one location to another, use a card sleeve or a protective holder. This minimizes the need to touch the card directly and provides an extra layer of protection against environmental factors.
Inspecting Cards: When using tools like magnifying glasses or lamps during inspection, ensure they do not come into direct contact with the cards. Maintain a safe distance to avoid accidental scratches or pressure marks.
Storage and Transportation: Even when not actively handling your cards, consider their protection. Use appropriate storage solutions like binders, boxes, or cases specifically designed for collectible cards. For transportation, secure your cards in rigid top-loaders or semi-rigid holders to prevent bending and damage during movement.
Sleeves and Semi-Rigid Holders
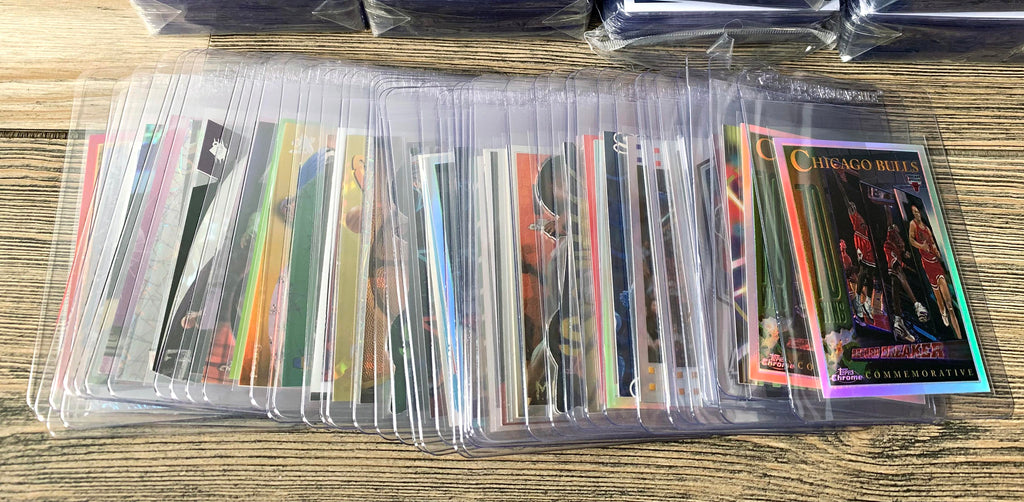
Ensuring your cards are properly protected before submission to a grading company is a critical step in the card grading preparation process. This protection not only safeguards the cards during transit but also maintains their condition as they await grading. Here's a more detailed look into the process of securing your cards for grading, focusing on the use of penny sleeves, top loaders, and semi-rigid card holders.
Penny Sleeves
Selection: Choose high-quality, acid-free penny sleeves. These sleeves are designed to protect the card's surface from scratches, dust, and other potential contaminants. The "penny" sleeve is so named because it's an affordable, yet essential, layer of protection.
Insertion: Carefully insert the card into the penny sleeve, ensuring not to catch the edges or corners of the card on the sleeve itself. It's often helpful to slightly bend the opening of the sleeve (without creasing it) to widen it for the card's entry. This minimizes the risk of damaging the card as you slide it in.
Top Loaders and Semi-Rigid Card Holders
After sleeving, the next step involves additional protection to prevent bending and impact damage.
Top Loaders: These are rigid plastic holders that offer excellent protection against bending, drops, and other physical impacts. When inserting a sleeved card into a top loader, ensure the open end of the penny sleeve goes in first. This prevents the card from sliding out of the sleeve inside the top loader and getting damaged. If the fit is tight, you can lightly tap the top loader against a soft surface to help the card settle at the bottom. Ensure there's no force used that could potentially bend or damage the card.
Semi-Rigid Card Holders: Semi-rigid holders provide a good balance between protection and flexibility. They're less rigid than top loaders but offer more support than a sleeve alone. These are particularly favored for submissions to grading companies because they're easy for the graders to open without risking damage to the card. When using semi-rigid holders, make sure the card is centered within the sleeve, and slide both into the holder gently, avoiding any bending or force.
Additional Tips for Card Protection
Avoid Overstuffing: Whether using top loaders or semi-rigid holders, ensure that the card fits snugly but is not overly tight. Forcing a card into a holder that's too small can cause warping or bending, while a holder that's too large can allow the card to move and potentially get damaged during transport.
Seal for Transit: Consider sealing the open end of the top loader or semi-rigid holder with a small piece of painters tape or a seal designed for card protection. This prevents the card from slipping out during handling and shipping. Be sure to use a tape that's easy to remove and doesn't leave residue.
Label Clearly: If you're sending multiple cards, label each top loader or semi-rigid holder with the card's details (e.g., name, set, and submission number if applicable). This helps ensure that there's no confusion during the grading process and allows for easier inventory management on your end.
Packaging for Shipping: When shipping your protected cards to the grading company, place them in a sturdy, rigid box with ample padding (bubble wrap, foam, or packing peanuts). The goal is to immobilize the cards within the box, preventing them from shifting or colliding with each other or the sides of the box during transit.
Conclusion
Preparing your cards for grading is a meticulous but rewarding process. By taking the time to carefully inspect, clean, and protect your cards before submission, you can maximize their potential grades and value. Remember, the key to successful card grading lies in attention to detail, patience, and a continuous desire to learn and adapt.
Leave a comment